Making the guides for the DVD Label
Before I can start producing the DVD label I first off need to make the guides. Down below are the steps that I took in order to successfully create the guides.
Step 1
The first thing that I did was open up Adobe
Illustrator CS6 and then went to the top tab of ‘File’ and then I clicked on
where it says ‘New’.

Step 2
After clicking on ‘New’ it then opens a box
where it allows me to be able to have the ability to alter the name, profile,
size, units in which the size is measured in, orientation of the page and the
bleed areas. For this instance I change the name and the units in which the size is measured in. I don’t select a size that is automatically there from the drop down box as I wish to insert the measurements myself I then also change the orientation from portrait to landscape.

Step 3
As I have entered the width and height manually
myself then this then creates the size type as ‘custom’. I have changed the
units to millimetres as this is the measurement type that I will be working
with when I create the DVD label. The width and height are both 135mm and the
explanation for this is that as the DVD Label is 120mm then this gives me room
to be able to cut out the label once completed but also means that images can
overlap within this area but will be cut once I have constructed a clipping
mask at the end to make the DVD Label have a professional finish. I then click
on ‘OK ‘to be able to apply and save these settings that I have chosen to have.
Once I have clicked on ‘OK’, it then brings up a new page with the requirements
I have just chosen.


Step 4
Once I
have opened up a new page I then go to rectangle tool icon and go down to the
ellipse tool as that is the tool that I need to first draw out the shape for
the DVD. I then move the cursor on the white page and double click.

Step 5
Once I have double clicked on the page a box then appears, what this box
allows you to do is enter the measurements for the width and the height of the
ellipse and therefore this will then create a perfect ellipse.
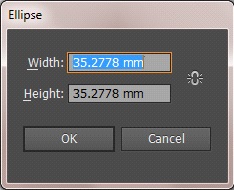
Step 6
I alter the width and the height to 120mm because this is the outer
circle and this is the correct measurement that is normally used. I then press ‘OK’ to accept.

Step 7
After pressing on ‘OK’ it then creates the circle with the measurements
that I have entered, however the circle isn’t all on the page so I select the
selection tool so that I can move the ellipse onto the page correctly.

Step 8
I then move the ellipse onto the page till the ‘centre’ in green appears
on the page , I do this so that I ensure that the ellipse is right on the
middle of the page and that the border around the ellipse is the exact same. I
then complete the process until I have the number of ellipses that I need to
help create the DVD label.

Step 9
Above are the other ellipses and their
measurements that I have selected. I
have selected to have these measurements as that is normally the sizes that are
constructed and therefore will make the DVD label look professional. I then
also ensure that the ellipses are centred. Now I have the DVD label shape that I need in
order to help complete the DVD label. Now I have these ellipses I now need to
turn these all into guides.


Step 10

Step 11
After I have selected ‘Make Guides’ it then turns the ellipse’s colour
from black to aqua and this then indicates that it is now a guide. I then do the same procedure
until all the ellipses are now guides.

Step 12
I repeat the step for all the other ellipses. I know have all the ellipses into guides as all are the aqua colour.

Step 13
Now that I have the entire guides all completed
I ensure that all the guides are now locked. I make the guides locked so that
the guides then can’t move on the page and therefore constantly in the same
exact same place throughout the construction of the DVD label. To lock the
guides I go to ‘view’ and then down to ‘Guides’ and across to ‘Lock Guides’.

Step 14
Now that I have all the guides locked I now make sure that I save the
template ready for future use.

Step 15
After I had clicked on ‘Save ‘ this box appears
which is basically all about how you can select some options like if you also
want to have a PDF file of that save. For this instance I just leave all the
options automatically chosen and select ‘OK’.

Step 16
The first part of the DVD label has been successfully completed.

No comments:
Post a Comment